THIS GUIDE IS OUTDATED. KEPT JUST FOR REFERENCE.
PLEASE SEE: Headscale + SWAG FOR AN UPDATED VERSION
![]()
Previously, we spoke of how easy is to set a mesh network between your devices with tailscale. Usually, that will work for most of the people, but in the view that you are using a third party server that might log your activity you would probably want to avoid that and maybe self host the mesh management (there are huge communities that like to selfhost this kind of services of their homelab). Luckily, headscale exist as An open source, self-hosted implementation of the Tailscale control server. It has support for most of the OS's
Of course, tailscale is more robust and sophisticated. Headscale only makes use of a single tailnet which is enough for a single organization or your homelab.
So we are goint to install headscale assuming the following:
- You have a VPS that will host headscale running 24/7 and is running Linux (Ubuntu 22.04 is the one I use now).
- Headscale will be run using the root user.
- You have created a DNS entry that redirects to your VPS address (see DuckDNS entry if you haven't).
- Your homelab is behind a NAT not able to forward ports.
- You have time and want to access your homelab from your phone.
Install Headscale
- On your VPS open TCP ports 80, 443 and 8080 and UDP ports 41641 and 3478 (this is optional to set a DERP relay and you can select another.
- Then download the binary for your platform from the releases section and save it in the bin path (usually
/usr/local/bin/in ubuntu). - Make it executable
sudo chmod +x /usr/local/bin/headscale - Create database directory:
sudo mkdir -p /var/lib/headscaleand an empty databasesudo touch /var/lib/headscale/db.sqlite - And finally create the directory for configuration:
sudo mkdir -p /etc/headscalewith its configurationsudo touch /etc/headscale/config.yaml
Now, for the configuration you can use this template and we need to change the following:
server_url: http://127.0.0.1:8080Change this for your public domain created with duckdns. For exaple:server_url: https://enchilada.duckdns.org:8080listen_addr: 127.0.0.1:8080Change it to listen all addresses:listen_addr: 0.0.0.0:8080ip_prefixes:Here you can modify the subdomain your layer network will have. The default is:100.64.0.0/10This means that the connected devices will addresses like100.64.0.2.derp:This is optional, if enabled the headscale server will act as a relay as well and it will be added to the plublic available derp servers from tailnet. By default DERP server is disabled, if you want it change it toenabled: true. Read here for more info.tls_letsencrypt_hostname: ""Add your domins like:tls_letsencrypt_hostname: "enchilada.duckdns.org"This is the domain name to request a TLS certificate from LetsEncrypt.tls_letsencrypt_cache_dir:./cacheChange it totls_letsencrypt_cache_dir: /var/lib/headscale/cache/var/lib/headscale/cachecommit b684ac0 Thanks to 7kn for pointing this out.dns_config:Here add the DNS server you'd like, by default there is only1.1.1.1in thenameservers:section.base_domain: example.comThis is for MagisDNS feature, change it toenchilada.duckdns.orgNow it will create an entry for devices like:phone.enchilada.duckdns.orgthat will be reachable for the devices connected.- Before first starting headscale, run
sudo mkdir -p /var/run/headscalesince the socket was moved in a recent update. Thanks to 7kn for pointing this out.
Now you can run it with sudo headscale serve to start the server. See here how to create a SystemD service to running it in the background and enable it at boot.
You can check with curl http://127.0.0.1:9090/metrics that everything went well and then create the network (tailnet) where you registered devices will communicate (replace mynet with the name you want):
| |
Join devices
In order to joint to mynet network, you can use the official tailscale app and run:
Linux and OpenWrt
Simple login can be done with:
| |
If you want to expose your local subnet (devices connected to your OpenWrt router) you should add the flag --advertise-routes=192.168.1.0/24. If you are running OpenWrt 22.03 or later, you need to add the flag --netfilter-mode=off and configure the firewall rules, due to tailscale uses still iptables and latest versions of OpenWrt switched to nftables. See issue here.
Android
Here, how to use a custom server in the official tailscale-android app.
Registrations to headscale
Now, everytime that you add a device with one of the steps above, you will be redirect to a webpage with instructions like this: Image taken from the GuruComputingBlog.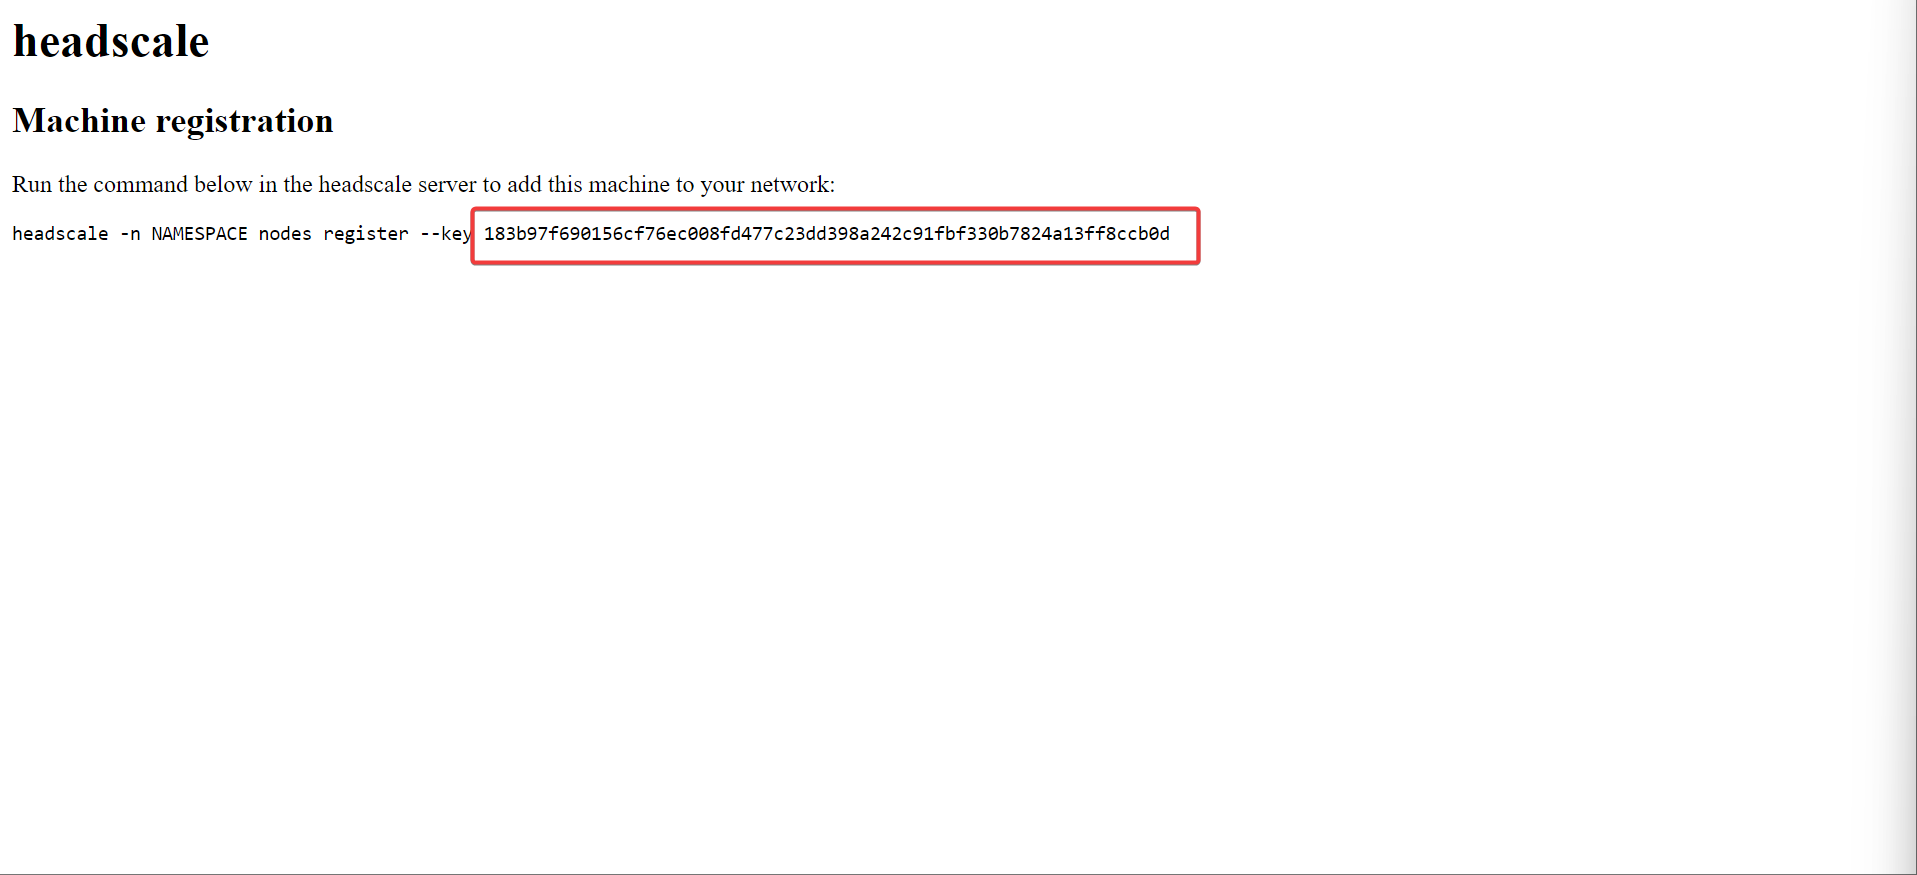
NOTE: In recent version of Headscale the -n command was substituted by --user
The instruction tells you to run the following command (as sudo in our case) in our headscale server:
| |
Replace NAMESPACE with mynet or the name you gave to your net and that's it.
You can check the list of devices (or nodes) by running the following in the headscale server
| |
Final thoughts
- The Guru Computing blog has a nice tutorial for setting headscale.
- Tailscale/headscale use NAT transversal techniques to establish direct connection between devices and avoid DERP relay servers. I haven't been able to see this working, at least from Phone-to-OpenWrt(router) and have not been able to test another devices since my network is very small.
- DERP servers are only used when no direct connection can not be established. This will add latency depending on the DERP server.
- Tailscale/headscale do not use the WireGuard kernel module, but the userspace implementation in go. Kernel module should, in theory, perform better than the userspace implementation. However, in practice you might not be able to tell the difference unless you are a hardcoded IT guy.
If you found this content useful, please support me:
BTC: 1E2YjL6ysiPxRF4AEdXChpzpesRuyzgE1y